Skip to main contentScroll Top
The process

Working with clay can be soothing and almost meditative, but there are some basic steps that cannot be skipped. (If you played with clay as a kid, you know how easily gravity can collapse your “master piece” :).  I use traditional hand building techniques to shape and mold clay into three-dimensional forms. Here is an overview of the steps I take when hand-building with water-based clay:

I. MAKING AN ARMATURE

An armature helps to provide support for the clay and ensures that the sculpture remains stable during the sculpting process. The support structure can be made of wire, metal pipes, or PVC. Sometimes I use newspaper to bulk up the structure. The newspaper offers a buffer as the clay dries and shrinks. The armature has to be removed before the firing phase and it can be reused in a different project.

reusing-armature
II.clay sculpting
  1. Preparing the clay: The clay must be soft enough to be easily molded but not so soft that it collapses under its own weight. A little spritz of water goes a long way.
  2. Shaping the clay: I primarily use my hands and wooden tools to add and remove clay.
  3. Refining the sculpture: After the basic form is created, I can begin smoothing out the surface of the clay, adding details or creating texture with brushes, sponges or burlap.
  4. Hollowing (if planning to fire the sculpture): Hollowing out a sculpture for firing in a kiln is an important step in ceramics to ensure that the piece does not crack or break during the firing process. The sculpture has be allowed to dry to a leather-hard state, where it is firm enough to handle but still has some moisture remaining in it. This can take several  days, depending on the size and thickness of the sculpture. After making the cutting line, I cut along the marked line to create a lid that can be removed to access the inside of the sculpture. Then using a loop tool, I carefully remove the clay from inside the sculpture, working from the top of the sculpture down. The walls of the sculpture should be left at an even thickness of approximately half inch to ensure even heating during firing. Once the inside of the sculpture has been hollowed out and smoothed, the lid can be carefully reattached using a thin coil of clay and slip. The coil should be smoothed over to ensure that it blends in with the rest of the sculpture. It has to dry completely before firing. This can take several days, depending on the size and thickness of the sculpture.
III. firing option
  1. Firing the sculpture: Once the sculpture is complete, it may be fired in a kiln to harden the clay. This process typically involves heating the clay to a high temperature for several hours. At this stage the ceramic sculpture can be glazed (which basically means it can be painted prior to firing to achieve a desired texture or color) *The hollowing and firing step can be skipped if planning to make a mold of the sculpture.
  2. Finishing the sculpture: After the sculpture has been fired and cooled, it is ready for any final touches like sanding or finishes, such as paint, wax or sealers.
iV. mold making option

Mold making seemed like a very difficult undertaking because there were so many materials and techniques available. Not to mention that if I didn’t execute it correctly, I could wind up destroying a sculpture.  After experimenting with re-usable materials like Composimold, I quickly realized I needed a more permanent solution.  Fast-forward a few years, and having had the opportunity to work with polyurethane molds, fiber glass and different resins,  I am very excited about the possibilities of casting in different materials! These are two molding techniques I’ve tried successfully:

  1. Creating a mold box or container, applying a release agent to the surface of the sculpture, and pouring a mold-making material over the sculpture to create a negative impression of the sculpture.
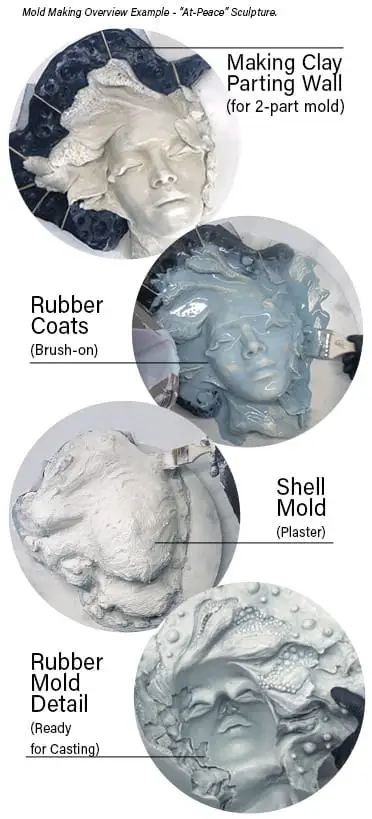
  2. “Brush-on” application of polyurethane or silicon rubber (example on the left). Once the mold material has cured, it is removed from the sculpture and can be used to cast replicas of the original sculpture using various casting materials such as plaster or resin.